

What Size Battery For 2015 Mitsubishi Outlander Sport
Mitsubishi Outlander Sport 12V Battery Replacement Guide
How to change a dead 12 volt machine battery in the engine bay of a 3rd generation 2011 to 2017 Outlander Sport.
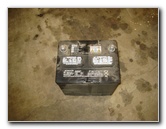
2015 Outlander Sport Battery
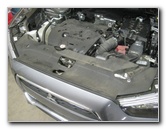
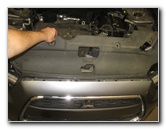
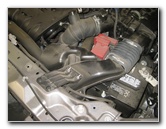
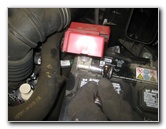
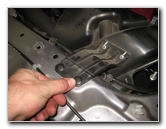
Plastic Radiator Cover
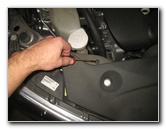
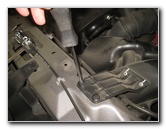
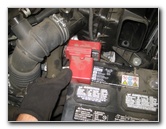
Pry Upward Center of Fastener
Owners of other Mitsubishi vehicles such as the Lancer, Outlander, Delusion, ASX, RVR, Galant, I-MIEV, Montero, Eclipse, 3000GT, Endeavour, Raider, Diamante, Attrage, Carisma, Filly, Grandis, Magna, Pajero and the Space Star may likewise discover these DIY instructions to exist helpful.
A few compatible replacement Group Size 35 batteries with their office numbers are equally follows: Optima 8040-218 D35, Optima 8020-164 35, Exide Edge FP-AGM35 and Bosch S6523B S6.
The tools needed to replace the battery include a flathead screwdriver (or a pop rivet removal tool), a Phillips caput screwdriver, and a 10mm wrench.

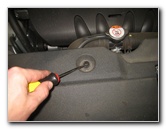
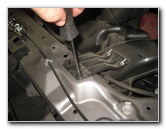
Plastic Pop Rivet Removed

3rd Pop Rivet
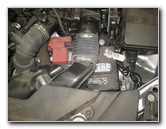
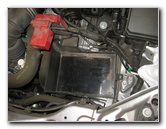
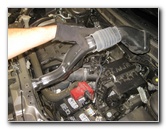
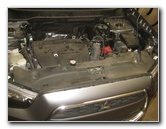
The 12V car battery is located behind the commuter side headlight housing, next to the electrical fuse box and below the air intake assembly.
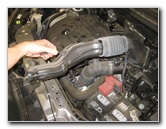
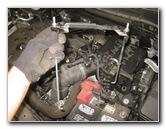
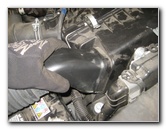
In order to access the erstwhile 12 volt battery, you'll get-go accept to remove the large black plastic radiator cover and the air intake.
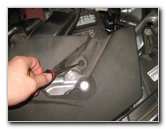
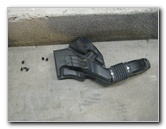
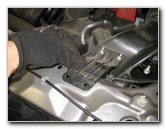
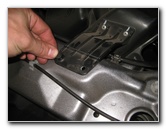
There are iv plastic pop rivets holding the radiator cover in place.
Utilise a flathead screwdriver or a popular rivet removal tool to pry out the center of each fastener earlier lifting out the base of operations.
Remove 4th Pop Rivet
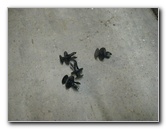
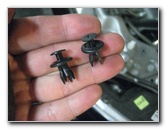
4 Popular Rivets Removed
Lift Plastic Encompass
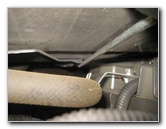
Gently lift the rear edge of the radiator cover and swing information technology towards the forepart bumper.
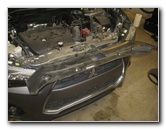
Plastic Cover Out of the Style
Plastic Air Intake
Loosen Counterclockwise
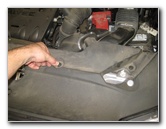
Locate the ii black plastic fasteners at the forepart edge of the air intake associates.
Loosen the plastic screws by turning them counterclockwise with the Phillips head screwdriver.
2nd Phillips Head Screw
ii Plastic Phillips Fasteners
Lift Out Air Intake Assembly
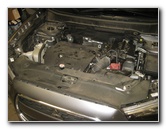
Gently elevator the front end border of the air intake assembly and pull the back end out of the engine air filter box.
6 Fasteners & Air Intake
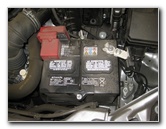
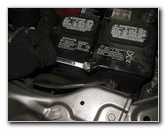
Old Battery Exposed
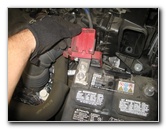
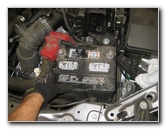
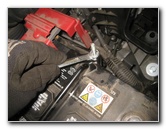
Loosen Negative Final
Loosen the negative "-" terminal on the correct (driver) side of the battery by turning the nut counterclockwise with a 10mm wrench or a 10mm socket with a 1/4" bulldoze ratchet.
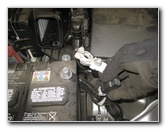
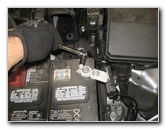
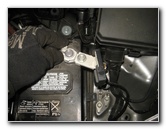
Pull Off "-" Terminal
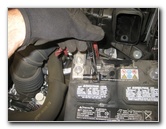
Comprehend & Tuck Away
Loosen Battery Clench
Wrap the terminal in a small towel and tuck information technology away on the side of the battery to help foreclose adventitious contact.
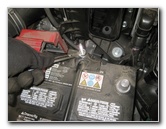
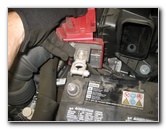
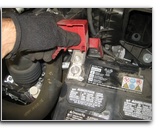
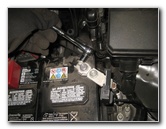
The battery concord down bar or "clamp" is held in place by two "J" hook confined with a 10mm nut attached to the superlative of each one.
Loosen the two nuts by turning them counterclockwise with a 10mm wrench or a deep well 10mm socket and a 1/4" drive ratchet.
Front 10mm Nut
Elevator Off Concord Downwardly Bar
Flip Open Red Plastic Cover
Pull the two "J" hooks at the bottom of the confined out of their sockets.
Elevator the battery clench out of the engine bay while avoiding making contact with the bombardment posts.
Set the battery clamp aside in a safe place.
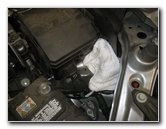
Flip open up the red plastic encompass on the positive "+" battery terminal.
Loosen 10mm Nut
Pull Off Positive Terminal
Lift Out Old Battery
Pull the positive terminal off the "+" battery mail service.
Flip the ruby plastic cover closed over the positive bombardment terminal to help forbid accidental electrical contact.
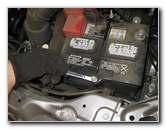
Carefully lift the former battery out of the engine bay and gently set up information technology downwardly on the ground.
Try to avoid dropping or tipping over the old battery which may cause acid to leak out.
Be sure to bring the onetime battery with you lot to the auto parts store or Walmart to avert having to pay a "core", "disposal" or recycling fee. The retailer will too take the quondam battery properly recycled.
If you can await a few days for commitment, I recommend buying the Optima 8040-218 D35 "Red Superlative" 12V bombardment since information technology has excellent reviews on Amazon.
(The OEM Grouping Size 35 battery was a Johnson Controls part number 8201A258 with 530 CCA and 118 reserve capacity.)
Clean Plastic Bombardment Tray
Lower In New Battery
Push button On Positive Concluding
Gently lower the new 12V battery in to the engine bay with the positive "+" post on the left (passenger) side and the negative "-" post on the correct (driver) side.
Push the positive concluding on to the "+" battery post on the left (passenger) side of the bombardment.
Tighten 10mm Nut
Close Red Plastic Cover

Lower In Battery Clamp
Try to avoid over tightening the last nut to prevent from damaging the battery post which may lead to an acid leak.
Flip the red plastic cover over the positive terminal.
Carefully lower the two "J" claw confined and the hold down bar down over the new battery.
Try to avoid making contact with the battery posts.

Re-Insert Rear "J" Hook
Re-Insert Front "J" Bar
Tighten 10mm Nut
Tighten the two 10mm nuts on the battery agree downwards clamp by turning them clockwise until they are snug.
Tighten Rear 10mm Nut
Push On Negative Terminal
Tighten 10mm Clockwise
If the new battery can be moved, tighten the two 10mm nuts on the hold downwards bar an extra plough or two.
Push the negative concluding on to the "-" battery mail.
Tighten the 10mm nut on the negative concluding in the clockwise direction until it is snug.
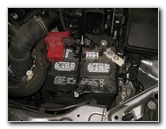
New Bombardment Installed
Lower In Air Intake
Re-Adhere To Air Box
Line Up Holes
Re-Insert Plastic Fasteners
Pop In Phillips Screws
Re-insert the two plastic fasteners and gently popular in the plastic Phillips head screws to secure them in place.
Flip Cover Back In Place
Supercede Four Pop Rivets
Radiator Cover Replaced
Re-insert the four plastic fasteners and pop in the heart piece of each one to secure them in place.
Test the new 12V bombardment by starting the engine and turning on the headlights.
Please remember to adjust the time on the clock and program your favorite radio station presets earlier you start driving.
For more, check out all of my 2011-2017 Mitsubishi Outlander DIY Repair & Maintenance Guides.

What Size Battery For 2015 Mitsubishi Outlander Sport,
Source: https://paulstravelpictures.com/Mitsubishi-Outlander-Sport-12V-Automotive-Battery-Replacement-Guide/
Posted by: cordelloury1957.blogspot.com
0 Response to "What Size Battery For 2015 Mitsubishi Outlander Sport"
Post a Comment